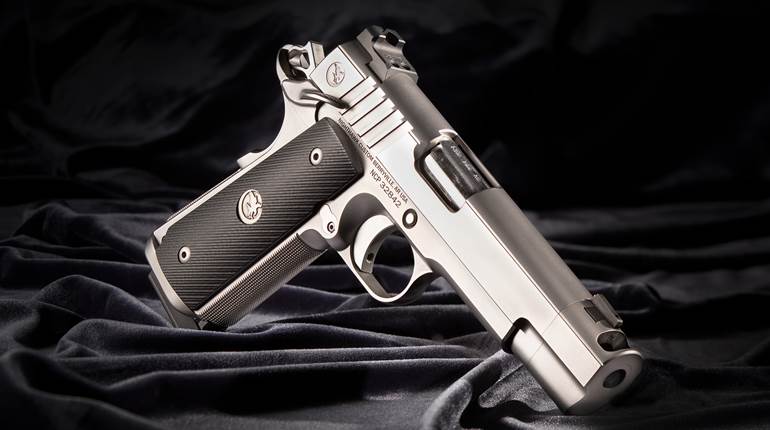
Back in the early ’90s, when I was a gunsmith at Behlert Precision in Pipersville, Pa., I performed quite a few reliability upgrades on M1911 pistols. Although the Government Model was (and arguably still is) a top contender for the title of “best combat pistol,” the reliability of the original mil-spec design was less than stellar. Originally designed for a 230-grain FMJ bullet, the M1911 had difficulties feeding the hollow-points popular with police and defensive shooters. Compounding the problem was the abundance of different chamberings and barrel lengths, as well as the proliferation of aftermarket M1911 parts and magazines made to varying tolerances.
Fortunately, the M1911 design is endlessly adaptable and is easily tuned for virtually faultless functioning. The skilled ’smiths in our custom shop, under the tutelage of famed pistolsmith Austin Behlert, developed a comprehensive M1911 reliability checklist. The following is a summarized version of that checklist, covering some of the major causes of—and fixes for—M1911 reliability problems. Generally, any of these problems should be corrected by a qualified M1911 pistolsmith, although some are not beyond the scope of an experienced home gunsmith.
Feeding
Ensuring feeding reliability usually begins with throating the barrel and polishing the feed ramp in the frame. If you lack confidence in your own skills, leave this to a gunsmith lest you ruin these expensive components.
Original factory barrels have a minimal bevel leading into the chamber, sufficient for 230-grain ball loads but often unreliable with other bullet shapes. This bevel or throat should be extended all the way around the chamber mouth. This can be done with a Dremel tool, performing the initial shaping with a grinding bit, smoothing the contour with a grit-impregnated rubber Cratex bit and hand-polishing to a mirror finish with fine (600- to 1,200-grit) abrasive paper.
The throat must be ground flat at the same 35 degree angle all the way around. To keep from cutting it too deeply into the chamber, it should not be funneled. Trim an empty case until its rim is even with the original bevel, insert the case into the chamber and scribe a faint line around the case rim at the chamber mouth. This creates a reference mark not to be crossed when grinding the throat.
To complete the job, the corner of the barrel throat leading into the chamber must be very slightly chamfered. Without this chamfer, the cartridge may partially enter the chamber but fail to go fully into battery. Don’t overdo it: Too much of a chamfer reduces case head support. Polishing the feed ramp in the frame is equally important. It is not necessary to remove all the machine marks in the ramp; all that’s needed is to smooth the overall surface. Run a 1/2-inch wooden dowel wrapped with a piece of abrasive paper along the ramp, maintaining the original 31-degree ramp angle, and avoid creating a funnel. I usually start with 600- or 800-grit paper and use successively finer grits until the desired polish is attained.
Feed ramps differ depending on chambering and frame manufacturer. A mismatch of caliber and feed ramp can produce a nosedive jam, in which the bullet nose hangs up on the feed ramp instead of sliding into the chamber.
When the barrel is placed in the frame and pushed all the way rearward, there should be a gap of about 0.030 of an inch between the feed ramp and the barrel. The absence of such a gap can produce feeding problems and must be remedied by a professional pistolsmith.
Feeding is also facilitated by polishing the chamber, accomplished by chucking a 3/16-1/4-inch wood dowel in an electric drill, wrapping the free end of the dowel in a strip of very fine (1,200- to 2,000-grit) abrasive paper, and running it in the chamber at low to moderate speed for a few seconds. The abrasive paper roll should be snug in the chamber, and it should be inserted only until the shoulder at the chamber mouth is felt.
The breechface on the slide should also be polished, and the upper edge of the firing pin hole slightly relieved with a needle file, to keep case rims from hanging up on it as they slide up the breechface.
Proper extractor tension and shape is also critical, to allow the cartridge case rim to easily slide under the extractor claw as the case travels up the breechface during feeding. The entrance to the claw should be beveled and slightly flared, and the extractor carefully bent so that about 5 pounds of pressure is needed to push a case rim under the claw. Excessive tension can cause the rim to hang up as it slides up the breechface.
Other contributors to feeding problems include a weak recoil spring, improper breechface dimensions, insufficient taper crimp on the ammunition, and magazines that rub on the underside of the slide. A weak magazine spring or old-style follower may allow the top round to nosedive into the feed ramp. Original G.I. magazines should be replaced with modern designs having parallel feed lips, strong springs and improved followers.
Extraction And Ejection
Insufficient extractor tension can prevent reliable extraction from the chamber. Ejection port dimensions are also critical. The bottom edge of the port—located about 0.615 inch above the slide rails in the original specifications—should be lowered to around 0.500 inch (some gunsmiths go lower, particularly when a red-dot sight is installed) with a milling machine, or by using files or a Dremel tool. If the job is done by hand, it’s useful to scribe a faint reference line on the slide at the desired port height. Again, be careful or defer to a gunsmith.
The inside bottom edge of the ejection port should be beveled using a small file, and the rear face of the port should be fluted with a 3/8-inch stone in a Dremel tool to help the case spin out of the gun. The flute should be deep enough to nearly contact the extractor tunnel in the slide. A flute that is too shallow leaves a wall at the rear of the port that can cause a momentary stutter in ejection, potentially contributing to a smokestack jam, in which the empty case projects from the ejection port.
On full-length M1911s in .45 ACP, replace the stock short ejector with a longer Commander-type ejector to initiate the ejection process earlier. Ensure that any such replacement ejector has adequate clearance with the slide and is not so long that it prevents ejection of live ball ammunition.
Ejection problems may also be caused by a too-strong recoil spring, easily diagnosed when cases barely dribble out of the ejection port instead of landing together about 7 to 9 feet to the right rear of the gun. Determining proper recoil spring tension is a bit of an art: The spring should be strong enough to ensure positive feeding, but should also allow strong ejection. The choice of the proper spring varies with slide length, caliber and load power; the recommendations from Wolff Springs are excellent starting points. Recoil spring reliability may be aided by the installation of a full-length guide rod, which can prevent the spring from kinking. The head of such a guide rod may have to be relieved at the top to prevent contact with the barrel’s lower lugs.
Firing
Firing malfunctions usually fall into one of two categories: doubling or failure to release the hammer. Doubling, machine gunning or hammer follow (the hammer dropping to the half-cock notch when a round is chambered) can be caused by a defective disconnector, or a hammer and sear that are worn or improperly modified to obtain a lighter trigger pull. Insufficient sear spring tension also may cause doubling, particularly on modified guns with light triggers. Bending the sear spring forward to increase its tension may eliminate this.
Failure to drop the hammer can occur when the overtravel screw on a custom trigger is turned in too far, preventing the trigger from moving far enough rearward to trip the sear. The overtravel screw should be adjusted to allow a generous amount of overtravel; too tight an adjustment may result in the sear blade nicking the half-cock notch on the hammer as the hammer falls. Full rearward trigger movement may also be blocked by an improperly fitted grip safety (see the “Safety” section below).
Light hits or misfires can be caused by: gunk in the firing pin tunnel; a reduced-power mainspring (sometimes installed to lighten the trigger pull); or a timing problem with the Series 80-style passive firing pin safety. In the Series 80 mechanism, pulling the trigger activates a linkage that raises a wasp-waisted plunger in the slide just enough to allow full firing pin movement. If the timing of the linkage is off, contact may occur between the firing pin and the plunger, diagnosed by dings on the plunger.
Finally, the trigger must be able to move freely in its track in the frame. The bow should be deburred or reshaped if it drags in the frame or binds on the gun’s magazine.
Safety
Functioning of the M1911 thumb safety must be checked whenever a new sear, hammer or safety is installed. First, with the pistol cleared, cock the hammer, rotate the safety to the “safe” position, and pull the trigger. You should feel no trigger movement of any sort. Next, with the trigger finger off the trigger, move the safety to the “fire” position. The hammer should not fall. If the thumb safety passes these two tests, it should be working properly. If any doubts persist, have a pistolsmith examine the gun.
For reliable grip safety function, the trigger stop part of the safety must be shaped to allow trigger movement when the safety is pressed, and block the trigger when it is not. The safety must also rotate freely and not rub on the mainspring housing or the frame. Moreover, excessive pressure of the right-hand finger of the sear spring on the grip safety can cause the safety to bind the trigger bow, preventing proper trigger return.
Finally, as noted above, malfunctioning Series 80-style safety mechanisms can be diagnosed through dings on the safety plunger. Correcting this problem, or any other safety problem with an M1911 pistol, should be left to a gunsmith.
Miscellaneous
Occasionally, the slide stop may pop up and lock the slide back before the magazine is empty. The fix is to put a tiny dimple in the face of the slide stop that is engaged by the frame-mounted plunger when the stop is in the lowered position.
Easy magazine insertion may be impaired by an overtight or gritty magazine catch, and it is rectified by polishing the underside of the engagement ledge and deburring the magazine catch opening in the frame. The magazine may also bind on overlong grip screw bushings that protrude into the magazine well. A little careful filing usually corrects this.
With a custom M1911, reliability issues can arise from a too-tight slide-to-frame fit, an insufficiently relieved barrel bushing (causing vertical barrel springing), or binding of a custom-fitted barrel’s hood or upper and lower lugs. The close tolerances in such guns may cause the slide to drag on the frame when the gun gets dirty or dry, and even produce galling, particularly with all-stainless-steel guns.
General reliability may also be enhanced by extra-tough disconnectors, extractors, firing pins and hammers that exceed original specifications for strength and longevity and are offered by many aftermarket manufacturers. Correspondingly, function may be compromised when no-name, economy-grade parts of unknown origin are used.
Of course, no matter what reliability work has been done, the M1911 must be kept clean and well-lubricated. Regular maintenance is also required, such as replacing recoil springs at regular intervals.
Finally, note that not all M1911 slides, frames and other parts adhere to original military specifications. Feed ramps with improper angle or depth, breechfaces that are offset or of the wrong width, barrels with incorrectly cut throats or chambers, and many other dimensional discrepancies can cause reliability issues that are difficult to both diagnose and address.
The above does not by any means exhaust the list of M1911 reliability issues that may be encountered. For more information on M1911 function, maintenance and modification, consult “The U.S. M1911/M1911A1 Pistols: A Shop Manual,” Vols. I & II, by Jerry Kuhnhausen; the “Wilson Combat 1911 Auto Maintenance Manual;” and the M1911 DVDs from American Gunsmithing Institute, Wilson Combat, Ed Brown and others. Such books and DVDs are usually carried by Brownells and MidwayUSA. Be aware, however, that no article, book or DVD can substitute for the experience and training of a skilled pistolsmith.


