We were glassing a small herd of whitetail deer in an alfalfa field about 250 yards. away when my hunting buddy said, “I think I can see antlers on the deer on the right. What do you see?”
“It’s a buck alright, and he’s got a fairly good four-by-five-point rack,” I said.
“Don’t try to tell me that you can count antler points at that distance with your eight-power binocular?”
“I sure can. Here, see for yourself,” I said, handing him the premium-grade 8x50 mm glass I had been field-testing.

He looked first through my binocular and then through his low-priced 10x25 mm roof prism compact and, as if unable to believe his eyes, repeated the process two more times. “This doesn’t make sense,” he said, adding, “And, after we’re done hunting, I want you to tell me why I can see better through your binocular at eight power than through mine at 10 power.”
The reason, as I explained later, was because my binocular had much better resolution than his, which contrary to what he believed, has relatively little to do with magnification. Resolution, also called resolving power, is defined as “the ability of a lens system to reproduce the points, lines and surfaces in an object as separate entities in the image.” Resolution is the primary factor in what is normally called image sharpness or definition. The other factors are acutance (the sharpness of the edges of image components) and contrast (the apparent difference in brightness between light and dark areas of an image). In short, resolution is about seeing extremely fine details with optical instruments—such as when distinguishing individual elk hairs on a reddish-tan patch in thick cover, or turning a brownish-gray speck on a brownish-gray rock slide two miles away into a bighorn ram, or spotting bullet holes “in the black” at 300 yards. with a spotting scope or riflescope.
Limiting Factors
Regarding the differences between my companion’s 10x25 mm binocular and my 8x50 mm, he pointed out mine had cost about 10 times as much as his, and therefore, it should have produced sharper images. He was right, of course. Optical quality does play a significant role in determining resolution. In short, you get what you pay for. But, optical quality is not the primary limiting factor when it comes to determining optical resolution. In what amounts to an immutable law of physics, the maximum resolving power of an optical instrument is proportional to the diameter of its objective lens (the optical element that receives light from viewed objects and forms the first or primary image within the instrument). The larger the objective diameter, the better the resolution and vice versa. The point beyond which an objective cannot resolve smaller detail is known as its theoretical resolution or limit of resolution.

The rules regarding optical quality are that, while poor optics—particularly those with serious optical aberrations—can significantly degrade resolution, even the very best optics cannot surpass the theoretical limit. For this to make sense, it is important to understand that when viewing an object through an optical instrument, you are not seeing the actual object, but the primary (or first) image of the object, which was created by the objective and is now magnified by the eyepiece. A higher magnification—though it may enable you to see better—is of limited value because once the point is reached where you can see all the existing details in the primary image, further enlargement of the image won’t help. It is analogous to enlarging a digital photo on your computer. Once the individual pixels can be seen, the image, though made larger, won’t get any sharper. A similar situation exists when viewing a low-resolution press photo through a powerful magnifier where the size of the dots that compose the image determines the resolution. In other words, no further magnification will reveal details that aren’t there. This explains why my 8x50 mm binocular, with its excellent resolution, revealed antler points that couldn’t be seen with my friend’s 10x25 mm binocular.
Airy’s Mysterious Disks
A bit of history is in order here. For 200 years—between the invention of the telescope in about 1600 and the acceptance of the wave theory (the idea that light travels in waves) in the early 1800s—telescope users, whose primary interest was studying the stars, believed there were no limits to optical resolution. If only they could make better optics, then their telescopes would image stars as perfect points of light. It must have been a frustrating endeavor because, no matter how good their optics became, stars still appeared as bright disks surrounded by progressively dimmer light and dark rings.
The acceptance of wave theory allowed Sir George Airy, a leading English astronomer for whom the disks were named, to prove that the light and dark rings resulted from wave interference caused by the diffraction of light as it passed by the edges of a telescope’s objective aperture. The dark rings occur where the waves are out of phase and cancel each other out, and the bright rings occur where waves are in phase and reinforce each other. The diameters of “Airy disks” were especially important to astronomers because they limited the ability of telescopes to resolve the images of double stars, which were being studied at the time. If the stars were extremely close together and the disks were quite large, the two disks often overlapped to the extent that they merged, giving the appearance that there was only one star. The rule is: The larger the diameter of the objective for a given focal length, the smaller the Airy disks will be, and the better the resolution. The effects are linear, in that doubling the diameter of the objective results in a 50 percent reduction in the diameter of the Airy disks, thus doubling the resolution.
How Resolution Is Measured
The formulas for calculating these criteria are too complicated to explain here. But, a simplified formula for Dawes’ limit (which I use) is that an instrument’s theoretical resolution in seconds of angle can be determined by dividing 114.3 by the objective diameter in millimeters. Accordingly, a spotting scope with a 60 mm objective has a theoretical resolution of 1.9 seconds, i.e., 114.3÷60=1.9.
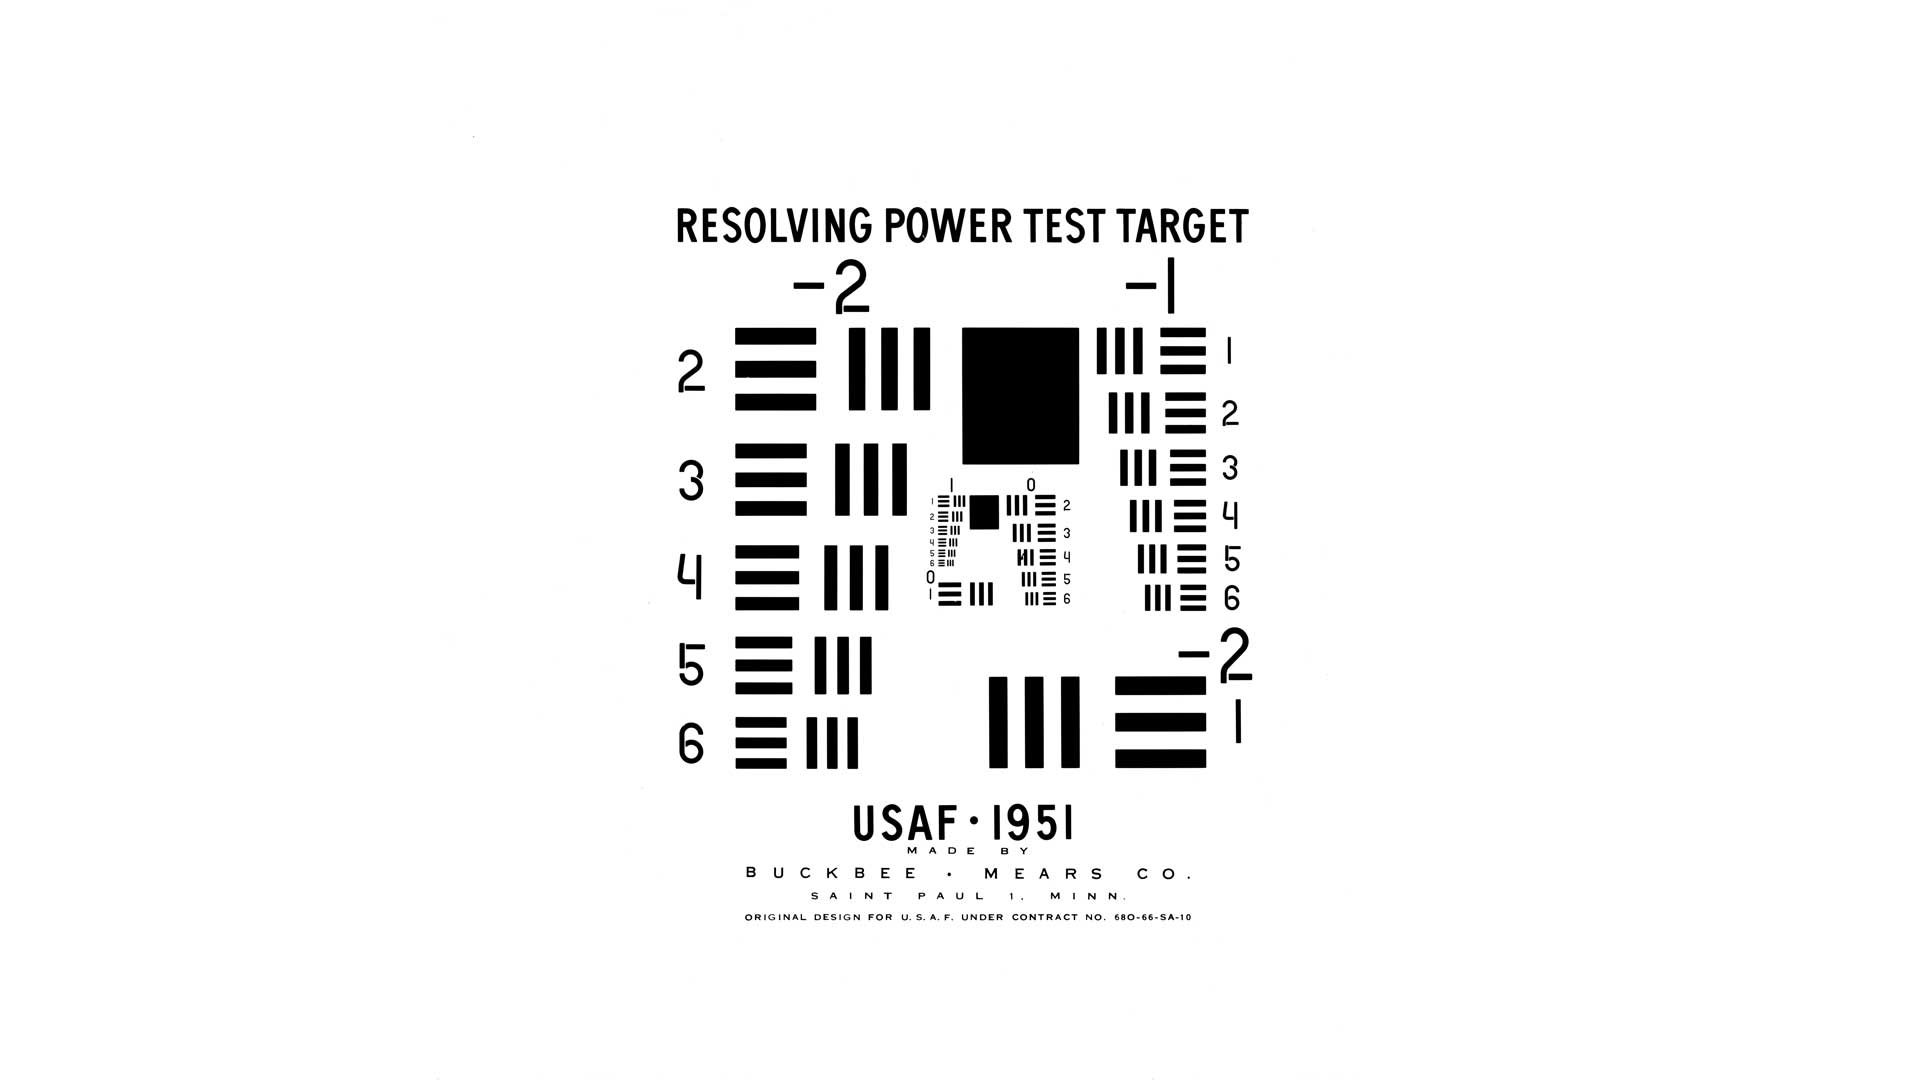
Resolution test targets consist of progressively smaller sets of black and white (or clear) lines. The most popular of these is the USAF 1951 Resolving Power Test Target, which was designed primarily to evaluate the performance of aerial cameras. In this target the number of lines per millimeter (l.p.m.) doubles with every sixth target element. An element consists of two target patterns of three lines each, at right angles to each other. These six elements are known as a group. When basing calculations on this or similar targets, it is important to understand each “line space” consists of a “line pair,” i.e., a black line plus an equally wide white line. An alternate way of measuring line spaces, with identical results, is to measure between the centers of adjacent black lines (below).

The goal when testing is to determine the smallest element in which the lines can be distinguished as separate entities. When camera lenses and/or photographic films are being tested (which is not our main concern here), the values are stated in l.p.m. The greater the number of l.p.m., the better the resolution. In the accompanying USAF target, the No. 1 element of the 0 group, has 1-l.p.m. line spaces, each consisting of a 1/2 mm black line plus a 1/2 mm white space.
For viewing instruments, such as binoculars, spotting scopes and telescopic sights, the values are usually expressed angularly in seconds of angle (s.o.a.), which are determined trigonometrically based on the viewing distance, and the line-pair width. The smaller the s.o.a. number, the better the resolution. An instrument that can resolve line pairs subtending 5 s.o.a. is twice as sharp as one that resolves 10 s.o.a..
For those who have a hard time comprehending minuscule angular measurements, it may help to think of them in terms of what they subtend to a distance of 100 yards. As target shooters know, one minute of angle (m.o.a.), which is one-sixtieth of a degree, subtends very nearly 1" (1.047") at 100 yards. However, don’t confuse minute-of-angle firearm accuracy, where a group of shots hit within a circle subtending 1 m.o.a., with optical resolution where a line space subtending 1 m.o.a. consists of a 1/2 m.o.a. black line plus a 1/2 m.o.a. white space.) One second of angle, which is 1/60th of a minute, subtends 0.01745" at 100 yards. Now, imagine viewing the USAF test target at 100 yards with a spotting scope and being able to resolve the lines in the No. 1 element of the 0 group, which at that distance would subtend 2.3 seconds. In the total absence of atmospheric pollution and mirage, you could theoretically resolve that element with an exceptionally good 60 mm scope, which didn’t work for me though I did manage to do so with a top-notch scope having a 78 mm objective.
The Visual-Acuity Factor
For those who are not already sufficiently confused, we will now consider visual acuity, which is the resolving power of human vision. Technically speaking, The Photonics Dictionary defines visual acuity as, “The numerical definition of the ability of an observer to perceive fine detail. The average value may be taken as one minute, or 6.7 cycles/mm, at 250 mm (normal viewing distance).”
Though very similar to optical resolution, which is based on the diameters of Airy disks, visual acuity is determined by the spacing of the cones (light-sensing cells) in the eye’s fovea centralis (a small depression near the center of the retina constituting the area of most acute vision). Basic Optics and Optical Instruments, a manual prepared by the Bureau of Naval Personnel, explains it this way. “If the image of one point falls on one cone of the fovea centralis, and the image of the other point falls on the cone next to it, your eye cannot resolve the two points. The reason for this is that the retina of the eye has no way of distinguishing between the two points and they therefore look like one point. If the two images, however, fall on separate cones, with an unstimulated cone between them, you can see them as two separate points.

“If you look at two points 10" away, your eyes cannot resolve them until they are approximately 0.004" apart. A normal eye can resolve two points if they are separated by an angle of from 1 to 2 minutes; so we can best express resolving power as an angle. When two adjacent objects become so small in apparent size that further reduction in size results in the eye’s failure to separate them, the angle of resolution of the eye has been reached.”
The good news is that the eyes can resolve much smaller details when assisted by magnification. For want of a better term, I was going to call this “magnification-assisted visual acuity,” which, though descriptive, sounds terribly stuffy. My fellow optics writer, John Barsness, suggested shortening it to “magnified visual acuity” or simply “magnified acuity,” which I will use here. In any event, it is calculated by dividing 60 s.o.a. (the visual acuity of the best human eyes) by the instrument’s magnification. Accordingly, a person with superb eyesight has a magnified acuity of 6 seconds when using a 10X binocular, i.e., 60÷10=6.
Tools For Do-It-Yourself Testing
Yes, do-it-yourself resolution testing is both possible and practical. And, it can be done without a great deal of expense or technical expertise. The necessities include:
1.) A USAF-1951 resolution test target. I suggest that you start by getting an Edmund Optics “Resolving Power Chart” for taking measurements in either l.p.m. or s.o.a. Edmund also offers professional-quality USAF targets for $136.
2.) Since resolutions often exceed the magnified acuity of the eye, you’ll also need a low-power auxiliary telescope to use behind the test instrument’s eyepiece. A 4X riflescope, with the reticle removed, works fine.
3.) You’ll need to post the target at an appropriate viewing distance (mine is 86 ft.), and you’ll need to devise some means to hold the test instruments and the auxiliary telescope steady. Testing is best done inside a building where the air is clear and still.
How Much Resolution Is Needed?
The rule of thumb common throughout the optical industry is that the resolution of the instrument should be better than 60 s.o.a. (the assumed visual acuity of the eye) divided by the magnification. In other words, the optical resolution of the instrument must exceed the magnified acuity of the viewer’s eyes. Thus, for a 10X instrument to produce acceptably sharp images, it will need an optical resolution better than 6 s.o.a., i.e., 60÷10=6. An 8X instrument will need a resolution of better than 7.5 seconds, i.e., 60÷8=7.5.
Ideally, the optical resolution of the instrument should exceed the magnified acuity of the eye to the point where it becomes limited by the theoretical resolution of the objective, which seldom ever happens. In my nearly 20 years of resolution testing, the instruments that came closest to their theoretical limits, based on Dawes’ limit, were the premium-quality spotting scopes having apochromatic objectives of extra low dispersion (ED) or high definition (HD) optical glasses. By closest, I mean within 1/10th or 2/10ths of an s.o.a., which amounts to a hairsbreadth.

One problem is that the spread between the magnified acuity of the eyes and the theoretical resolutions of instruments can be very narrow, particularly with so-called “compacts,” having very small objectives. For example, first-rate 10x25 mm compact binoculars usually have resolutions of around 5.5 seconds, which means many cut-rate 10x25 mm compacts fail to reach the 6-s.o.a. resolution needed to produce sharp images at 10X. Conversely, it is common for high-quality 10x50 mm binoculars to have resolutions as good as 3 s.o.a., and, of the many 10x50 mms I have tested, only one had a resolution poorer than 6 s.o.a.
A slightly different problem exists with variable-power instruments such as spotting scopes and high-powered riflescopes, in which magnification ranges regularly exceed the theoretical-resolution limits of the objectives. The classic example is a 15-60x60 mm spotting scope, where the highest magnification of 60X is roughly twice as high as the 31.6X maximum sharp power the 1.9-second theoretical resolution of a 60 mm objective can produce, i.e., 60÷1.9=31.6. However, most viewers won’t notice a serious loss of sharpness until the power exceeds 45X, which explains why zoom eyepieces for 60 mm spotting scopes usually top out at 45X.
Odds And Ends
Should you decide to begin resolution testing, you’ll find that even among premium-quality instruments, which are built to tighter tolerances, there are minor differences in resolution between otherwise identical models or between the right and left barrels of the same instrument. This is no problem as long as the resolutions are significantly better than the magnified acuity of the viewer’s eyes. Budget-priced optics, on the other hand, tend to have wide variations in resolution.

Also, the resolution is invariably less sharp near the edges of the field. Therefore, tests should be made both at the center of the field and about 30 percent of the way in from the edge. Don’t be surprised if the edge resolution is less than half as good as the center resolution. It is desirable to have excellent resolution extend as far as possible toward the edges of the field, but the loss of resolution near the edge is not as great a problem as one might think, because the visual acuity of the eye also decreases near the edges of its field. Furthermore, whenever something of interest is detected near the edges of the field, we instinctively rotate the instrument, along with our eyes, to reposition the object near the center.
This article appeared originally in the September 2005 issue of American Rifleman. To subscribe to the magazine,visit the NRA membership page here and select American Rifleman as your member magazine.


